Guides
How to Convert MP4 to GIF: The Complete Guide (2026)
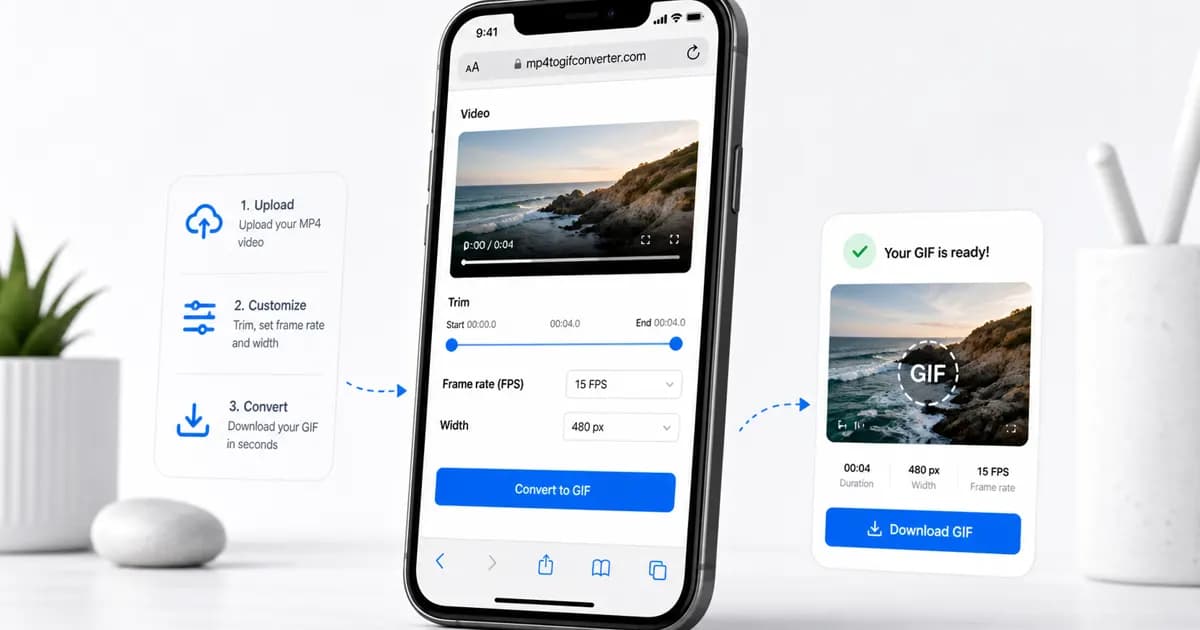
To convert MP4 to GIF in 2026, the best approach is to use a local browser-based converter. You select your video file, trim the length, choose the frame rate and width, and export a high-quality GIF. Because the conversion runs locally via WebAssembly, your file is never uploaded to an external server, keeping it entirely private and making the process near-instant.
Quick Answer
For the vast majority of clips, the best default settings are a 3 to 5 second duration, 10 frames per second (FPS), and a width of 480px. This setup keeps the final GIF sharp and smooth enough for messaging apps and social media while preventing the file size from exploding.
The fastest method: convert MP4 to GIF online
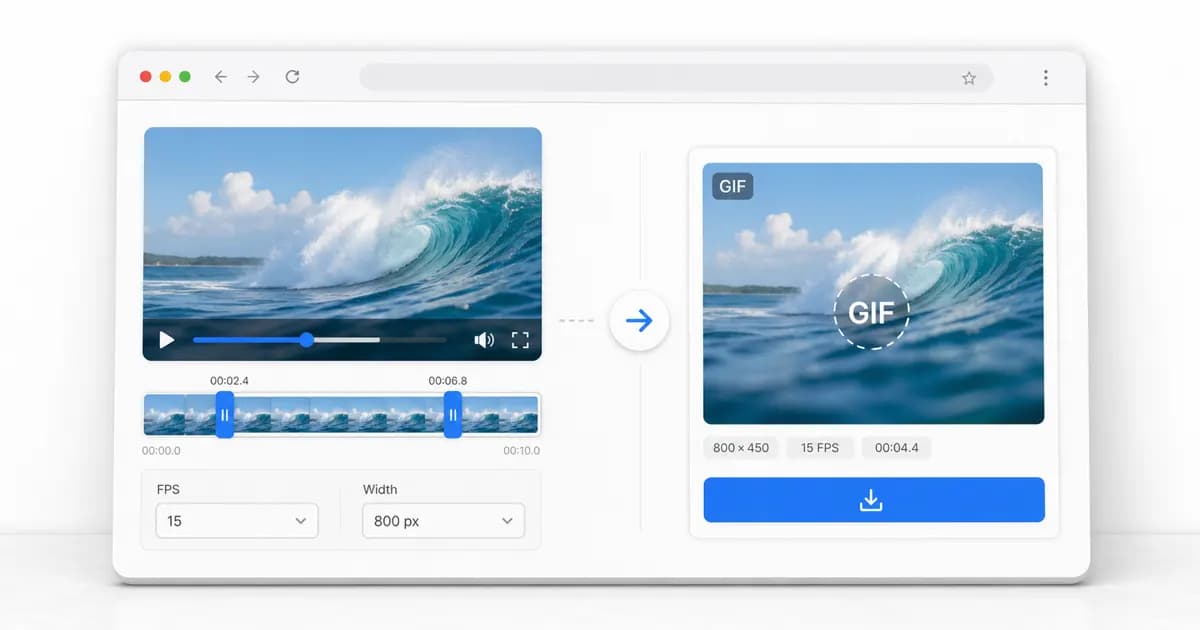
For most users, the simplest and most convenient path is to use a modern, browser-based converter that runs completely locally. Standard online file converters require you to upload your video file to their remote servers. This process is not only slow—especially on mobile connections or with larger source videos—but it also raises significant privacy concerns. With browser-based local tools, the entire video processing happens inside your browser tab using WebAssembly, which means your original file never leaves your device.
To begin, simply select the MP4 file you want to convert from your computer or smartphone storage. Once the file loads, you will be presented with a timeline. Trimming the video to the precise moment of action is the single most powerful step to control the final output size. GIFs are essentially a series of uncompressed or minimally compressed images stacked together; therefore, every single second of video adds substantial weight to the final file.
After trimming, you can customize the export options, including the output width (resolution) and the frame rate (FPS). Once you click the convert button, the local encoder compiles the frames. In just a few seconds, the browser will output a high-quality GIF ready to download. There are no wait queues, no server processing delays, and absolutely no privacy risks.
- Choose local browser processing to bypass upload times and keep your files completely private.
- Trim your video down aggressively to only show the key loop, which is critical for reducing file size.
- Start with a sensible baseline of 480px width and 10 FPS to check the conversion output before making it larger.
- Test the loop transition to make sure the end frame flows smoothly back into the start frame for a seamless animation.
What settings give the best GIF results?
When converting video to GIF, three main variables control the visual quality and final file size: duration, frame rate (FPS), and width (resolution). Understanding how these factors interact allows you to optimize your exports and prevent creating a massive file that platforms will reject.
Duration is the most significant factor because it determines the total number of frames in the GIF. A 10-second GIF at 10 FPS requires 100 individual images to be compiled, whereas a 3-second GIF at the same frame rate requires only 30 images. Keeping your loops short is the easiest way to preserve quality while keeping the file size small.
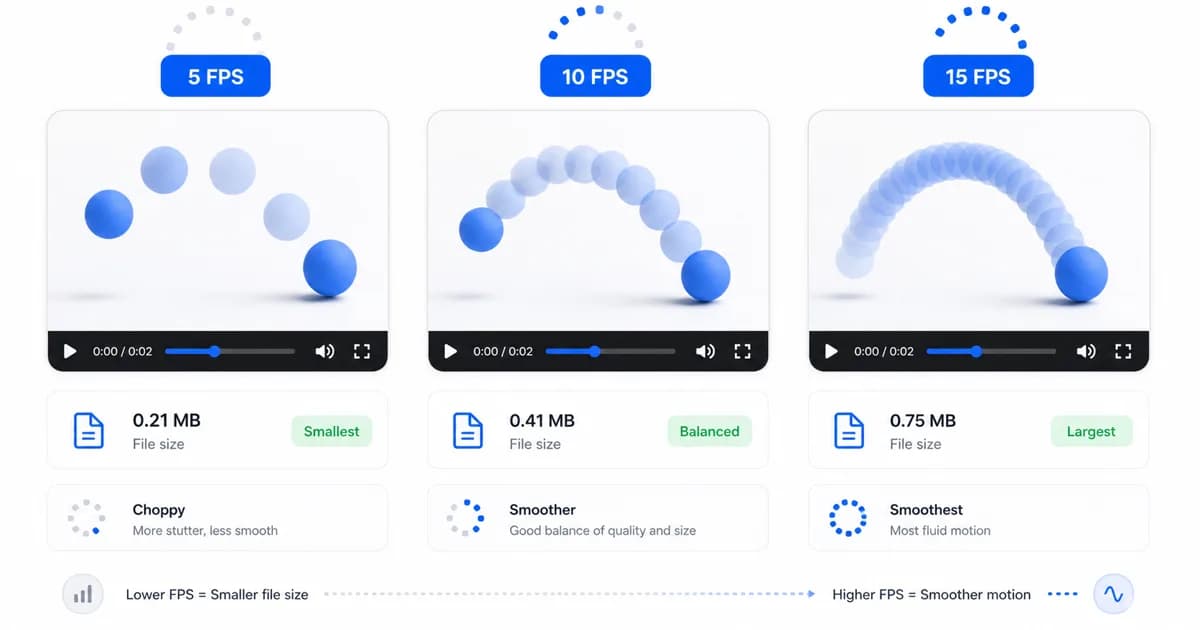
Frame rate dictates the smoothness of the motion. While standard video runs at 24, 30, or even 60 frames per second, GIFs look perfectly acceptable at much lower frame rates. For the majority of loops, 10 FPS offers a fantastic balance. It provides readable, smooth motion without creating a heavy file. Lowering the frame rate to 5 FPS will make the motion look choppy and jerky, while pushing it to 15 or 24 FPS will make it look buttery smooth but can triple the file size.
Width determines the resolution of the image. Since GIFs are typically viewed inline on social media feeds, chat messages, or documentation sites, you rarely need a high-resolution export. A width of 480px is the sweet spot for social sharing and chat apps. If you are creating a detailed guide or a technical product demo where small text needs to be legible, 640px or 800px is more appropriate, but you should shorten the duration to compensate for the added resolution.
| Setting | Good default | Why it works | Ideal Use Case |
|---|---|---|---|
| Clip length | 3 to 5 seconds | Short loops are easier to share and process quickly. | Social media reactions, quick visual cues |
| Frame rate | 10 FPS | Balances smoothness and file size without excessive weight. | Default setting for messaging apps and chat channels |
| Width | 480px | Looks clean on mobile and desktop screens without loading delays. | General sharing, Twitter/X, Discord, Slack posts |
| High resolution | 640px to 800px | Maintains readability for fine details and interface elements. | Software tutorials, product demonstrations, documentation |
How to convert MP4 to GIF on iPhone and Android
Mobile video files are often shot in 1080p or 4K resolution at 30 or 60 frames per second. Trying to convert these heavy source videos directly on your phone without modifying the settings will almost always result in an oversized GIF that is too large to send via text message or share on social media.
On iOS devices, Safari provides a clean and direct environment for browser-based conversion. You simply open the converter page, select the video from your photo library, and apply your settings. iOS web browsers are highly optimized, allowing WebAssembly code to compile your GIF directly in the browser. After the conversion finishes, you can long-press the output GIF to save it directly to your Photos app under the "Animated" album.
On Android devices, Google Chrome serves as the ideal browser. The process is identical: tap the upload area, select your MP4 from your files or Google Photos, trim the clip, and set the options. Since Android devices vary significantly in hardware power, starting with conservative settings (like 480px width and 10 FPS) is highly recommended to ensure the conversion completes quickly without freezing your browser tab.
- Open your mobile browser (Safari on iPhone, Chrome on Android) and navigate to the local converter page.
- Keep mobile clips short—ideally under 5 seconds—to prevent high memory usage during the conversion process.
- Export at 480px or 320px width for mobile messaging formats like WhatsApp, iMessage, and Discord.
- Use Wi-Fi when importing videos from cloud storage to avoid consuming mobile data caps.
How to convert MP4 to GIF with FFmpeg
For developers, system administrators, and advanced users who need to automate media processing, the command-line utility FFmpeg is the gold standard. Generating a high-quality GIF with FFmpeg requires a two-pass workflow. By default, simple converters use a generic color palette, which leads to banding and washed-out colors. A two-pass approach first analyzes the video to generate a custom 256-color palette, and then applies that palette to render the final GIF.
The first command analyzes the input video (`input.mp4`) starting from a specific timestamp (`-ss 00:00:00`) for a duration of 5 seconds (`-t 5`). It filters the video by scaling the width to 480px while maintaining the aspect ratio (`scale=480:-1`), setting the frame rate to 10 FPS (`fps=10`), and using the lanczos scaling algorithm to generate a custom color palette (`palettegen`). This palette is saved as a temporary image file (`palette.png`).
The second command applies the generated palette to the input video. It reads the source video and the palette file, scales the video, and encodes the final output (`output.gif`) using the custom palette (`paletteuse`). This results in a sharp, vibrant GIF with accurate color representation and minimal file weight.
# Pass 1: Analyze the video and generate a custom color palette
ffmpeg -y -ss 00:00:00 -t 5 -i input.mp4 -vf "fps=10,scale=480:-1:flags=lanczos,palettegen" palette.png

# Pass 2: Apply the custom palette to create the high-quality GIF
ffmpeg -y -ss 00:00:00 -t 5 -i input.mp4 -i palette.png -filter_complex "fps=10,scale=480:-1:flags=lanczos[x];[x][1:v]paletteuse" output.gif
Common mistakes that make GIFs too large
Many users struggle with oversized GIF files because they apply video-editing logic to an image-based format. The most frequent error is exporting excessive duration. Leaving even a couple of seconds of static footage at the start or end of a clip will bloat the file size without adding any value to the loop.
Another common issue is retaining the original video dimensions. An HD or 4K video contains millions of pixels per frame. While video formats use motion vectors to store only the changes between frames, GIFs store complete pixel data for every single frame. Exporting a GIF at 1080p resolution will result in a file that can easily exceed 50 megabytes, making it impossible to share on most platforms.
Finally, assuming that a higher frame rate is always better is a major pitfall. A GIF running at 30 FPS requires three times as much data as one running at 10 FPS. For simple reactions, website tutorials, and meme formats, the human eye does not need high-frame-rate fluidity to understand the action. Lowering the frame rate is a low-impact way to dramatically reduce file weight.
- Trim your source footage closely to focus purely on the action or loop.
- Never export at original resolution unless your source video is already very small.
- Use 10 FPS as your standard baseline, dropping to 5 or 8 FPS for slow-moving content.
- Avoid complex gradients and high-detail backgrounds in your source footage when possible, as they make compression less effective.
The science of GIF compression
To understand why GIFs are so heavy, it helps to look at how the format stores data. The Graphics Interchange Format (GIF) was created in 1987. It uses LZW compression, which is a lossless compression algorithm designed for flat areas of color, like graphics and logos. It was never intended to compress high-definition, photographic video frames with subtle gradients and complex camera noise.
Unlike modern video formats (such as MP4, WebM, or AV1) that analyze the differences between consecutive frames—only saving the pixels that actually change—GIF stores every frame as an independent image. If you have a video with camera movement, every single pixel changes in every frame, meaning the LZW compression has to save a completely new image each time. This is why static camera shots compress much better in GIF format than shots with panning, zoom, or camera shake.
Additionally, GIF is limited to a maximum of 256 colors per frame. When you convert a 24-bit true color video to an 8-bit GIF, the encoder must choose a color map that best represents the original colors. If the encoder does not generate a custom palette, it will default to a standard Web-safe palette, resulting in noticeable color banding. Modern converters solve this by analyzing the specific video to build a tailored color palette, maintaining high visual quality despite the format's strict limitations.
Frequently Asked Questions
What is the best MP4 to GIF setting for general use?
For the vast majority of social media, chat, and email sharing, a duration of 3 to 5 seconds, a frame rate of 10 FPS, and a width of 480px offers the best balance of smooth motion, sharpness, and small file size.
Why is my converted GIF larger than the original MP4 file?
MP4 uses highly advanced compression algorithms (like H.264 or H.265) that only store changes between frames. GIF is a legacy image format that stores every frame as an individual image, making it significantly less efficient for video data.
Do I need to install desktop software to convert MP4 to GIF?
No, you do not. Modern browser-based converters use WebAssembly to run the conversion process locally on your machine. This gives you the speed and privacy of desktop software without needing to install anything.
Does this browser-based tool support transparent backgrounds?
Yes, if your source video is an MP4 (or MOV/WebM) with an alpha channel containing transparency, the conversion engine will automatically detect and preserve the transparent background in the exported GIF.
How do I reduce the file size of a GIF that is already created?
You can shrink a heavy GIF by reducing its resolution, lowering the frame rate, shortening the loop, or running the file through a lossy GIF optimizer that discards redundant pixel data.
What video formats can be converted to GIF using this tool?
Our browser-based converter supports all major video formats, including MP4, MOV, WebM, AVI, MKV, and FLV. Because processing runs locally, you do not have to wait for large files to upload to a remote server.
Ready to try it?
Convert MP4 to GIF free
Trim the clip, choose the best settings, and export locally in your browser.
Open the converter